4.06.2012

Invitations

I dabble in photography and prefer Photoshop for editing purposes.  My wonderful husband surprised me with CS5 for Mother's Day last year and the features improved quite a bit from CS2 which I was using previously.

I've had a few requests for custom invitations for family and had fun brushing up on my design and editing.  Here are some examples.


I'm sorry for the ugly watermarks but you never know who'll steal your stuff. :)

12.01.2011

Dress to Apron

Nothing like being broke to bring out the craftiness in me! My Christmastime crafting schedule is overbooked.  We like to exchange gifts with family and this year I decided to make all the gifts by hand.

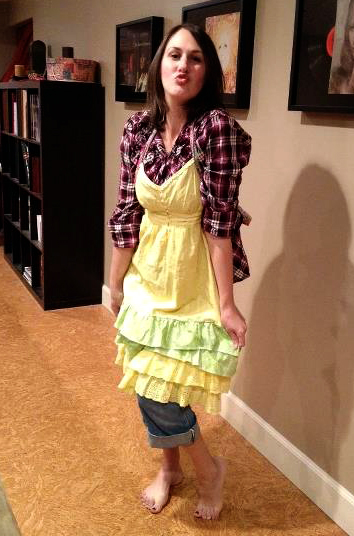
My sweet sister-in-law was first on my list.  I looked through my giant pile of clothes and fabric which I keep for moments of inspiration such as this.  I found a bright yellow sundress and thought, "What a cute apron that would be with a little embellishment!"

I simply cut the back of the dress off and added some ruffles and straps and voila!  An apron to inspire delicious cooking!

Modeling the apron

6.17.2011

Countdown to Babies

My mile long list of nesting strategies is becoming shorter by the day.  I've been tackling at least 2 projects a day so I can be ready for these little ladies when they decide to show up.  My last big project was to make slipcovers for a glider that my awesome neighbor/friend gave me.  I was so excited when she asked if I wanted it because I have wanted a glider for a LONG time!  We have an old rocking chair that I love (because it's classic) but it's so very uncomfortable to hold babies in.

I wasn't sure what to expect as far as fabric prices are concerned because I rarely buy home decor fabric.  I went to Joann's to try my luck and found some beautiful fabrics that I would have loved to buy...in another, less frugal, life.  So I headed to the clearance area and found this cute, simple houndstooth fabric and figured it would be neutral enough to fit with a variety of decor.

I've never reupholstered anything or made slipcovers for anything before so this was a new adventure for me!  I turned the fabric right-side in and pinned around the cushions the best I could, slipped the pinned fabric off the cushions, sewed them and created snap closures on the bottoms of the cushions so I'd be able to take them off and wash as necessary.  I left the maroon vinyl on as an extra layer of insulation from the cushions.  You never know what will end up on a glider and need to be washed off.

My honey helped me take the ottoman apart so we could staple the fabric on (probably my favorite part because I got to use the staple gun).

I also got to use my new serger (courtesy of my wonderful mother!! A perfect baby gift!).

Before

After

Fabric closeup

3.17.2011

What to do with an empty can:

I was cleaning up after lunch today and went to put away the can of Gatorade my husband had used but found that it was empty.  I rinsed it out and got ready to recycle it when I thought, "Hm, maybe I can recycle it into something useful!" 

If you have young girls at home, you know how messy the "hair" drawer can get.  It spews barrettes, bows and ribbons every time I open it.  It's so overwhelming that I hardly use any of the accessories because I just don't want to take the time to organize them all.

I had a bright idea!  Let's use this old can to make an organizer for our bows!

This would also work for any other organizing need and the great thing about it is that it's free!  You just use the leftover fabric scraps and ribbons you have around your house.

Here's what you need:
1.  Cleaned coffee/Gatorade/large can
2.  Remnant piece of fabric large enough to cover the can
3.  Ribbons/trim to beautify!
4.  Hot glue gun


Step 1:  Cut your fabric with enough leftover to tuck under the bottom and into the top of the can.  I left about 3/4in for the bottom and about 2in for the top (just so I didn't see the can looking right at it).
Step 2:  Wrap and glue the fabric around the can.  It's nice to have a fabric that has a bit of stretch/give so you don't have to be perfectly lined up each time you glue.  I used a light linen I had leftover from this project.  I only glued the beginning edge along the whole height of the can and then the very end the same way.  I didn't glue anything around the top or bottom edges since it will be tucked under/over later.


Step 3:  Pull the bottom edges of fabric over the bottom edge of the can and glue.  Don't worry about trimming all the strings.  You can if you want to, but I like the homemade/rustic look of leaving them.


Step 4:  Turn the can over and tuck the top edges of the fabric inside the can and glue.  This can be a little difficult depending on how much fabric you left to tuck in.  Go ahead and trim some off if it's too hard to reach your glue gun inside the can.


Step 5:  Add ribbon and trim however you want!  Since it's almost Springtime, I wanted to use some organic and Springy colors.


Final Product:
 
I clipped some flower clips I made around the top for easy access.  I glued a bit of ric rac around the middle and left portions unglued and away from the can's surface so I can clip barrettes and bobby pins to those instead of digging around inside the can to find them.  I'll probably store combs and bigger things inside the can.


3.05.2011

Car Seat Canopies: Done!

I finally dug our infant car seat out of storage so I could make sure I made the canopies to fit.  My kids were very curious about this new car seat, especially my 2 year old since she was the last to be in it and can't remember.

I bought this beautiful fabric at The Village Quilt Shop in Gardener's Village.  They have the most wonderful selection of fabrics but are unfortunately way over my budget (at about $9/yard).  Luckily for me, they have a few clearance bolts and I was able to find all 4 coordinating fabrics for about $4.50/yard.  I bought the accessories (buttons and trims) at Joann's.

I made these so that they're reversible.  The side I have pictured is the main side and just in case it gets dirty and I want to flip it before I have time to wash it, I've sewed straps onto the opposite side.

I used a few different sites to guide me along but mostly eye-balled it.  It's pretty basic so it was nice to not use a pattern.  I used a big glass bowl to round the edges of my fabric so they'd all be even.  Every car seat is different so it's better to use your own as a guide for where to put the straps.

Here's what you need (for just one canopy):

2 1/2 yards coordinating fabric (1 1/4 of each print)
Accent Thread
Buttons, Ric Rac, and ruffle are optional

For Twin A


For Twin B


2.26.2011

Homemade gifts are always better

You know how when you want to give a gift to someone and you want it to be memorable, how hard it is to find the perfect gift?  I'm rarely satisfied with the options I have to purchase.  Not that they're not nice quality or that the person won't like them but I know it will most likely be a gift that's forgotten and won't have any sentimental value to it.

My precious niece, Olive, whose birth I witnessed, is turning one!  I can't believe its already been a year.  Her mom is throwing a birthday party today and I wanted to get Olive something special.  I know she's only one and doesn't have any clue about what's going on and won't remember anything about this day but I wanted to get her something special.

I had the crafty itch and decided to see what I could come up with.  My sister said Olive loves to take things out of bags and put them back in.  She could do it all day long.  I thought it would be fun for Olive to have her own little bag instead of disassembling mom's purse every time she got the urge.

I pulled out some scraps and this is what I came up with:


It is the simplest of bags and only took about a half hour to sew but it will serve it's purpose!

Now, something to go inside the bag.  I started looking for baby toys online and was reunited with the wonderful site called The Purl Bee.  It's awesome!!  She has tons of tutorials and even sells sewing and knitting supplies.  She had this tutorial for a toy she called "Best Bunnies".  I thought they were so cute and perfect for a one year old!  This is how mine turned out.  It is one bunny with alternating fabrics and the bunny has 2 faces, one on each side.


2.04.2011

Projects on my "To do" list

Since I found out we're having twin girls (yay!), I've given myself the go ahead for a few new projects.

Car Seat Canopy x 2
I haven't found the right fabric yet, but I'll be making 2 of these to make our car seats coordinate a little better.  Since we already have one infant car seat, I'm going the cheap route and buying only one more (not matching) so I'll use the canopies to help them be a little bit matchier (made-up word).

"Moby/Sleepy Wrap Lookalike"
This is the only carrier that can carry twins comfortably and safely.  I know I can buy one of these babies for $40 but I figured I'd try to find the fabric and make my own.  It shouldn't be too hard as it's just one strip of 5.5 yards by 30 in fabric.  If I buy 60 in fabric I can get two for one!  I have yet to find the right fabric.

Car Seat Replacement Pads
Again, since I'm not going to be buying matching car seats, I've been mulling this option over for a while now.  I'm considering attempting my own car seat pads.  I think they can be pretty involved and it's always hard for me to do 2 of one project because I feel satisfied after I've done the one and can't make myself start it all over again.  Do any of you have a good pattern for these?  It's certainly not something I can bust out on my own.

So keep checking back! I'll be working on these things this week.

1.22.2011

Onesie Embelleshments and Burp Rags

I've been feeling much more like crafting now that my time isn't being taken up lying in bed and holding back vomit.  If you haven't heard our news yet, we're expecting identical twins in July!  You can go to my other blog: jsbushfam.blogspot.com to read about those adventures.

I also had a great reason to thread my sewing machine again because my friend is having her first baby in March and I decided to get her some essentials and to spiff them up a bit.

In my personal experience, cloth diapers make the absolute BEST burp rags.  They super absorbent and soft.  I bought a little hem lace and rick rack to spice them up!  This is definitely not a new idea, just a good one worth doing over and over.


We all know how many Onesies one baby can go through in a day...and sometimes in an hour.  You can never have enough!  I got these ideas from other crafty ladies all over the internet.

The dress Onesie.  Sew a simple rectangle of fabric, hem the bottom, gather the waste, and sew it to the shirt! This was so easy and fast and a great way to keep babies cool in the summer without looking to drab in a plain one.

I call this one the "Fancy Tux".  I started by sewing a small rectangle of the hem lace down the middle, just below the neck line.  Then I cut out LOTS of circles from an old, black t-shirt about an inch to and inch and a half in diameter.  Fold the circle in half, twice, then sew bunches of 5 folded circles onto the shirt at a time.  I felt like it still needed a little something so I added some ruffled lace around the outside of the black circles.  If you need more detailed diagrams, let me know.
Ruffled bum.  You can do this with any extra fabric or trim you have lying around.  I used lace because I wanted it to be a little daintier.  You can also sew down the middle of an inch wide strip of fabric to gather it, then attach it to the Onesie by sewing down the middle again.  Add as many ruffles as you like!

To accessorize this little baby girl, I decided to crochet a hat for her.

12.08.2010

Anthro Wonderland

Anthro Wonderland
Anthro Wonderland by sarahbush3 featuring wrap scarves

A combination between fashion and art/expression where whimsy and holidays meet.


9.23.2010

a home for my yoga mat

I'm feeling quite refreshed and happy after practicing yoga last night--so much that I'm still thinking about it almost 24 hours later.  Well, why not do something yoga-ish then?!

So I made this.  With no pattern.  This is all you have to do:

1.  Measure your mat's length and circumference.  Add 3 inches to both measurements.  Example:  My mat's circumference is 13 inches and is 24 inches long.  My fabric measurements are 16" by 27".  I just used a piece of scrap fabric from another project. 

2.  Cut a strip (matching or not) about 3" by 27" (the same length as your first piece).  If you want a wider strap, go with 4" by 27".

3.  Cut 2 circles using an object in your house that has the same circumference as your mat + 4" (so mine is 17").  I used a tray for a bunch of blank DVDs.  Keep the circles together with right-sides out.  Baste if you want. I hate basting and pinning so I usually don't.

4.  Sew the strip, right-sides in, length-wise.  Sew one end of the strip closed.  Turn right-side out.

5.  Sew the main piece of fabric, right-sides in, up the side.

6.  Sew the circle pieces to the bottom of your main piece (circles are still right-sides out and back to back, main piece is still right-sides in).  I didn't pin mine, I just held the edges as I went.  It's easier if you keep the circle piece on bottom and your main piece on top as you go around the edges so you can use circle as a guide.

7. Hem upper edge of case. You can either add a drawstring here or add a snap or button for closure. Or leave it open. Totally up to you!

8. Turn your work right-side out. You're almost done!

9. Attach the strap about 3" from bottom and top (tuck the edges in on the open end of the strap before sewing to leave a clean edge).


Namaste

8.30.2010

Jewelry Display

On my recent trip to Santa Fe and many hours spent jewelry shopping, I became inspired to make one of these.  What an easy way to display your jewelry and to have it all there to see when you get ready each day.  I've had this dilemma for years now.  My jewelry lives in about 5 different locations and I have to dig through each vessel before I find what I want.  I don't want to use travel cases unless I'm TRAVELING.

So I went to Michael's for the unfinished frame and craft paint, Lowe's for the dowels, and used some sand paper, wood glue, and a saw from home.

Don't you love it?  I do.


My mom gave me a few little paperclips with cute birds and yarn flowers from Anthropologie (love) and I wanted to use them as barrettes for Sophie (or me) so I took the paperclips off and glued them to some barrettes covered with ribbon (so the glue would stick to something besides the metal barrette).  They turned out SO cute and they get worn almost every day.

Oh, the chicken isn't from Anthro.  It's just a silly button I had lying around.

4.17.2010

Rompers are fun!

I just love the look of rompers on babies in the summertime.  I've stocked up on summer fabrics and can't wait to make more of these!


This is actually a scrap piece that my mom gave me so I could use the fabric for something cute.  Well I didn't have to modify it too much!  I just sized it way down to Sophie's size.  Cute!

4.01.2010

Easter Part 2

I don't mean to toot my own horn but when I finished this dress and held it up to actually look at the little details, it literally took my breath away.  It's mostly because of the beautiful fabric and lace trim (and maybe a little of my handiwork ;) )

So here it is.  The finished product.  Sophie's Easter dress.  It looks more like something I should hang up on a wall but I suppose I'll let her wear it for a little bit as long as there is no chocolate within a 100 foot radius.

I'll post some pictures of her wearing it when we get our family pictures done.  I can't wait!!

3.27.2010

Easter Part 1

Memories of Easter dresses is what got me thinking about this project.  I remember going shopping for the perfect dress with a matching hat and white gloves.  I wanted to make Sophie's outfit this year and I wanted to do something vintage.  I found this great pattern by Simplicity.  It's a 1948 reprint and I fell in love with it immediately.  By the way, it's #2629.

I decided to go with a simple yet stylish fabric for the jacket so that she'd be able to wear it with other outfits this spring and summer.  Working with the pattern was easy overall but I did run into a snag when it came to sewing on the collar.  I just couldn't visualize how it was going to work out when it came time to turn it right-side out.  A quick email sent to Simplicity saved me and a very nice and helpful customer service person emailed me right back and with 2 more emails I understood everything and trusted her enough to go ahead and finish what I wasn't sure would work.  Well, it DID!  And this success made my day.  It took me about 4 days to finish the project.


To Come: Easter Part 2 (Dress)

3.18.2010

i'm alive and well and even creating!

I'm so sorry for my prolonged absence.  I have done numerous projects which were mostly gifts and didn't want to post them because the gifts would have been spoiled.  So I'm back and ready to post!  My next potential project is an Easter dress for Sophie.  I'd LOVE to do something unconventional.  Any ideas?? 

To come:  Cardigan Resuscitation

12.04.2009

this belongs on a tree

Just finished an adorable skirt for Sophie.  I had the holidays in mind.  I bought this fabric from the clearance section and didn't realize how hard it would be to work with until I got half way through the project and didn't want to throw out my work.  The fabric is home decor fabric so I knew it wasn't made for what I was using it for.  But I persevered and I love the end result.

I used Sophie's Christmas skirt for a pattern and winged it from there.


I decided I might as well make a matching hair flower while I was at it.  Cute, eh?


Happy December and Merry Christmas!

11.17.2009

inspired flower

I went to lunch with my dearest sister the other day and she had on an amazing flower headband she made.  She inspired me to try the flower thing again.  I like this one.  I think I'll wear it.


11.13.2009

my creative history

Some years ago while trying to declare what it was that I was going to do for the rest of my life--or so it seems when you're declaring a major in college--I took an aptitude test. This test was supposed to reveal exactly what my calling in life was and provide immediate relief and assurance. Well, things didn't turn out exactly as I had planned. The test results unearthed what I thought I already knew but didn't think plausible. It told me that I was artistic and liked to build things--work with my hands. Instead of picking a new university at which to study, I picked the most interesting major with the easiest and shortest route to graduation.

Shortly after I got married, my dearest mom decided that an appropriate birthday gift would be my first sewing machine. I was genuinely excited and already started thinking of possible projects.

I learned to sew in a home-ec class in middle school and the very first thing I sewed (with a sewing machine) was a Chicago Bulls themed pillow for my big brother. It was ugly but I was proud of it...even though the letters were off center and the "S" was nearly swallowed up in the seem. I had sewn doll clothes (Barbie size) and other useless things by hand throughout elementary and middle school but this was my first real project. After that, beside a few scrunchies and a pair of pajama pants, I didn't sew another thing until a dear friend told me she was having her first baby.  A baby quilt! What a perfect beginning project for my new machine!

Almost three years later, when I prepared to have my own baby girl, I finished that same blanket. Too embarrassed to admit I'd actually started it for my friend, I decided to hold on to it for my own use (let's just say it wasn't a flawless work of art).

It was the announcement that our second baby would be a girl that lit the creative fire for me. I've been sewing my heart out in my rare, spare time ever since then. In addition to my sewing machine, I've dabbled in mosaics, photography, and a few other crafties.

10.19.2009

sweaters to dresses

I love the thought of creating something cute from existing clothes.  This time I used a couple of sweaters that I don't wear anymore to make a couple of adorable dresses for Sophie.

The first was a cream colored cardigan I got as a hand-me-down from my sister but I never wore it.  It had bell-sleeves that I hated.  But I knew it had potential.  Watch the transformation...


before


after


in action


The second sweater is a light wool.  It was one of my favorites but I no longer liked the length.
This one was a little more technical.  I cut off the sleeves, took-in the shoulders, and took out some length.


before


after


after, too