4.30.2009

fishy shoes

something for Jonah

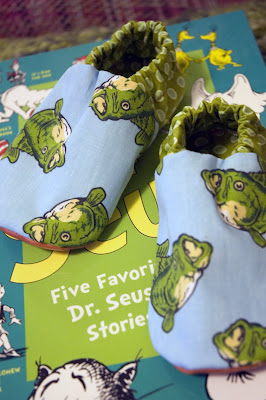
Since Sophie's shoes turned out so well, I decided to make a pair for Jonah too. The soles of Sophie's shoes are made of cotton but since Jonah is more active and runs around, I made his more sturdy. I bought some vinyl at the fabric store the other day. I think it'll be plenty strong for how often/long he wears the shoes.


I also happened to pick up a few more "fat quarters" of fabric. I just can't resist! All of the colors and patterns make me happy!


4.28.2009

project #5 (special request)

baby leg warmers

Here is a cheap, easy way to make your baby some leg warmers. I, for one, am not willing to spend $11 or $12 bucks on a pair of leg warmers when I can make them in 5 minutes for a few bucks. These make great gifts and are very simple to make. Let's get started!

what you need:
  1. A cute pair of knee high socks. If you're making leg warmers for newborns, use a pair of girl's knee highs. For older babies, use women's knee highs. I have even used my husbands worn out socks to make some for my daughter. Just make sure the foot part isn't threadbare. It's OK if there are holes in the toes and heels because these parts will be cut out and discarded.
  2. Coordinating thread


here's how:


1. Cut the sock in a straight line just above the heel line. The leg part of the sock will be the main part of your leg warmer.


2. With the remaining part of the sock, cut in a straight line just below the heel and again just above the toe. Make sure you have straight edges on both ends of the remaining piece. This will be the upper cuff of the leg warmer.


3. Fold the cuff piece in half, right sides out, lining up the raw edges.


4. Find the raw edge of the leg warmer and tuck it inside the cuff piece lining up all 3 raw edges on top. Align the pattern as desired (it's not really necessary to align solids or stripes but argyles or other patterns might require a bit of tweaking).


5. Pin in place.


6. Sew around the end completely. Make sure you catch all 3 raw edges in your seam.


VOILA! You have an adorable leg warmer!! If you want 2, which I suspect you will, repeat steps 1-6.


4.27.2009

project #4

soft-sole baby shoes

There are tons of free patterns online to make your own soft-sole baby shoes. These shoes were a fun, fast project and are super cute! The great thing is that you probably have all the materials on hand already.

what you need:
You'll need some cute fabric scraps for the top and lining of your shoes. You'll also need some elastic (the amount depends on what size of shoes you'll be making). If you want to use a stronger material for the sole of the shoes, you can use either leather or a non-slip fabric (like they use on footy pajamas). You'll also need a pattern or if you're brave, you can come up with your own.


optional patterns:
I used this pattern. Here is a list of different links to patterns for making your own baby shoes.
I really wanted to find a pattern for mary janes but was unable to find a free one. So I'm currently working on coming up with one. I might just post it up here when it's done depending on my mood.


Here are some pictures of my final product. I'm very pleased and plan on making many more--maybe even some for Jonah!


4.23.2009

tip #1

how to sew a perfect circle


I'm currently working on a project for my mom for mother's day. I don't think she reads this blog so hopefully I'm not spoiling anything--but just in case, I won't get to detailed on what the project is until it's complete. Anyway, for this project I needed to know how to sew a perfect circle. I'm not about to ruin it by trying to sew a circle just by following the circle I outlined on the fabric.

Thanks to my dear friend Google, I found perfect instructions on how to do this...and I don't have to buy any fancy gizmos! Just for clarification--I take no credit for this tip but I thank whoever came up with it!

Here's how:
  1. Find the radius of your circle (forgot your geometry? That's half the diameter)
  2. Get a thumbtack and some masking tape.
  3. Let's say my radius is 2 inches. I'm going to place my thumbtack 2 inches to the left of my needle and tape it down using the masking tape (just stick the thumbtack through the sticky side of the tape and tape the thumbtack to your machine).
  4. On your fabric, find the center of the circle and place it on the thumbtack.
  5. Now sew your circle! The fabric will rotate around the thumbtack, allowing you to sew a perfect circle. No guiding necessary!

4.20.2009

last night I dreamt...

about a new design for a baby dress! I was excited to wake up and get it down on paper. Project details to follow!

4.14.2009

project #3

butterick 3846

This is the first baby item I've made using a pattern. I've been working on it for about a month on and off, whenever I had spare time. I finally had to tell myself that it's OK that it takes a long time to complete a project because it's just for fun and I don't want it to become a stressful thing on my to-do list. I learned a TON while working on this outfit. I think working from a pattern is a great idea if you want to learn a lot of the basic sewing techniques.


I used the medium sized pattern. Sophie will probably be able to wear this next Spring. This outfit is 2 pieces, top and bottom.


One of the great things about a simple pattern is that you can get creative with embellishments and making it your own. For this outfit, I picked a really bold fabric with a lot of color variation so it didn't really need much. I used a yo-yo maker and button-cover kit to make these little flowers for the bottom-right of the top.


4.09.2009

project #2

tie-dye...always an experiment

Sophie had some white onesies and I needed some tie-dye. The great thing about tie-dye is that you can't really mess up and the final product is always different!!

The Process:
  1. Mix your dyes according to package directions. This may require a little customizing and cutting corners if you don't want to mix the whole package of dye. You can also buy a tie-dye kit. For this project I used Dylon, which can be purchased at Wal-Mart or any craft store. I only mixed half of each package which still ended up being WAY more dye than we needed. TIP: Don't mix dye in bowls that you love because they may leave them stained. (I learned this the hard way and have stained my pink Williams-Sonoma mixing bowls.)
  2. Tie your shirts/clothing. There are numerous ways to do this depending on what effect you want. The ever-s0-popular spiral look is achieved by pinching the fabric where you want the center of the spiral to be, then spinning the fabric in one direction until you have a tight wheel of fabric. Secure with rubber bands. It doesn't really matter how many rubber bands you use. The dye will seep under the bands so they don't really provide a barrier to color. For other ideas on tying, go here or just search the Internet.

  3. Start dying! We used cups to pour the dye onto the fabric. It may be easier to use squirt bottles. We didn't have any so we improvised. You can also use a spray bottle to get a little splatter action going. TIP: If you want part of the fabric to remain white, don't POUR the dye on, just drizzle it. The dye tends to soak in really easily so go easy.

  4. Wait. Place each article of clothing in a separate plastic bag to keep it moist. For maximum results, let the dye sit for 24 hours before washing.

  5. Wash. First, you'll want to rinse the fabric in COLD water while it is still tied--until the water runs fairly clear. Then untie, and rinse again in HOT water until clear. Then wash your fabric in HOT water, using your regular laundry detergent.

These are simple directions compared to some you'll find on the Internet. I found that this process worked perfectly, however, and I had no need for the more technical instructions (like using soda-ash or synthrapol).

Pictures of the final products:


4.06.2009

project #1

t-shirt recycled into yoga pants

Rundown: Take an old t-shirt, cut, sew, embellish, et voila!


Here's How:

  1. Get a t-shirt and cut 2 pant legs. Cutting from the long edges or your shirt will allow you to keep the seem already sewn there and use it for the outside edges of the pant legs. Here is a horrible drawing to help you see where I cut from. Next time I'll remember to take pictures of the process.
  2. Turn the 2 legs inside out and sew each leg up the inside leg.
  3. With the legs still turned inside out, sew up the crotch. Its a good idea to go over the crotch twice to make sure it withstands the wear.

  4. There are 2 options for the waste, OPTION 1 - with pants turned inside out, fold the waste band down and hem, leaving about 1 and 1/2 inches open to slide elastic in. Then sew up opening after adding elastic. OPTION 2 - cut another strip of fabric long enough to go around entire waste and tall enough to fold down when wearing. Turn pants right-side out. Pin (I rarely pin but often pay for it) the waste band along the waste of the pants on the outside and stitch. I hope this makes sense. Leave a comment if you have questions. I used OPTION 2 and made it up as I went so don't be scared to get creative. There is no right or wrong here!!

  5. Embellish your pants however you like! I created my own appliques and used double-sided interfacing (glue on both sides) to stick them to the fabric using my hot iron. Then I hand-stitched with embroidery floss to secure the edges. Get creative with your stitches! There are lots to choose from!
Here are some pictures of the final product.