12.04.2009

this belongs on a tree

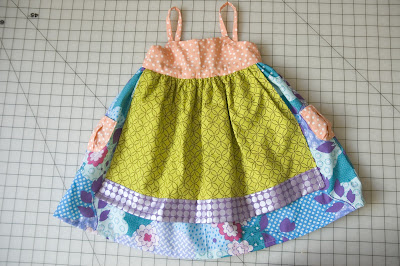
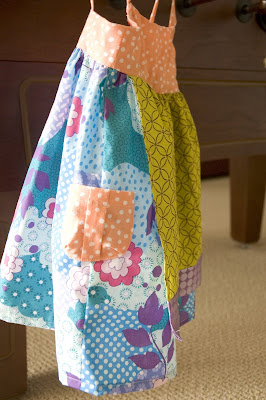
Just finished an adorable skirt for Sophie.  I had the holidays in mind.  I bought this fabric from the clearance section and didn't realize how hard it would be to work with until I got half way through the project and didn't want to throw out my work.  The fabric is home decor fabric so I knew it wasn't made for what I was using it for.  But I persevered and I love the end result.

I used Sophie's Christmas skirt for a pattern and winged it from there.


I decided I might as well make a matching hair flower while I was at it.  Cute, eh?


Happy December and Merry Christmas!

11.17.2009

inspired flower

I went to lunch with my dearest sister the other day and she had on an amazing flower headband she made.  She inspired me to try the flower thing again.  I like this one.  I think I'll wear it.


11.13.2009

my creative history

Some years ago while trying to declare what it was that I was going to do for the rest of my life--or so it seems when you're declaring a major in college--I took an aptitude test. This test was supposed to reveal exactly what my calling in life was and provide immediate relief and assurance. Well, things didn't turn out exactly as I had planned. The test results unearthed what I thought I already knew but didn't think plausible. It told me that I was artistic and liked to build things--work with my hands. Instead of picking a new university at which to study, I picked the most interesting major with the easiest and shortest route to graduation.

Shortly after I got married, my dearest mom decided that an appropriate birthday gift would be my first sewing machine. I was genuinely excited and already started thinking of possible projects.

I learned to sew in a home-ec class in middle school and the very first thing I sewed (with a sewing machine) was a Chicago Bulls themed pillow for my big brother. It was ugly but I was proud of it...even though the letters were off center and the "S" was nearly swallowed up in the seem. I had sewn doll clothes (Barbie size) and other useless things by hand throughout elementary and middle school but this was my first real project. After that, beside a few scrunchies and a pair of pajama pants, I didn't sew another thing until a dear friend told me she was having her first baby.  A baby quilt! What a perfect beginning project for my new machine!

Almost three years later, when I prepared to have my own baby girl, I finished that same blanket. Too embarrassed to admit I'd actually started it for my friend, I decided to hold on to it for my own use (let's just say it wasn't a flawless work of art).

It was the announcement that our second baby would be a girl that lit the creative fire for me. I've been sewing my heart out in my rare, spare time ever since then. In addition to my sewing machine, I've dabbled in mosaics, photography, and a few other crafties.

10.19.2009

sweaters to dresses

I love the thought of creating something cute from existing clothes.  This time I used a couple of sweaters that I don't wear anymore to make a couple of adorable dresses for Sophie.

The first was a cream colored cardigan I got as a hand-me-down from my sister but I never wore it.  It had bell-sleeves that I hated.  But I knew it had potential.  Watch the transformation...


before


after


in action


The second sweater is a light wool.  It was one of my favorites but I no longer liked the length.
This one was a little more technical.  I cut off the sleeves, took-in the shoulders, and took out some length.


before


after


after, too

10.12.2009

stripes are something cute

I bought three of these shirts/sweatshirts after I had Jonah.  They were comfy and hid my belly.  I don't wear them anymore so I decided to make them into something I would wear. 


before


after


self-portrait

I added a button and a hood.  I used an old tank top for the hood liner.  It's super cozy and I love the final product. 
Forgive the tie-dye...or not--it rocks and you know it. 

10.09.2009

15 minutes = 3 new pairs of...

 baby leg warmers

I bought some cute socks at Target the other day with the intention of turning them into some leg warmers for Sophie.  Her others are getting too small so this time I shopped in the women's department for socks.  They have some really cute knee highs right now which are perfect for baby leggings!

If you can find 15 minutes out of your day, you, too, can have some of these!


Refer my tutorial post on making baby leg warmers if you want some of your own.

9.22.2009

mary janes for sophie sue

This is a project I've been excited about for a while.  I'm too cheap to buy a pattern for mary janes online so I decided to come up with my own.  I'm really pleased with the final product and I'm excited to try different versions and exercise a little creativity on them. 
I only have 1 shoe of the pair finished but I was so excited that it turned out that I couldn't wait to post it.

here it is:


more to come :)

7.29.2009

Sophie Dress and Jonah Pants

I'm still here! Since getting my machine fixed, I've completed these 2 projects. I love them both!

  1. Sophie Dress
  2. Jonah's "Huck Finn" Pants
The Sophie Dress (I'm just calling it that because I made it for Sophie) was a lot of fun and really simple. I used Simplicity 2707 for the majority of the dress. To make it mine, I added the apron. I thought it added a needed "different" dimension. What do you think?

While making this dress, I learned how to put in my very first zipper. Let me just tell you how I feel about zippers, I HATE THEM! From now on, I'll avoid them however I can. Don't laugh--it took me 2--2-- hours to put that stupid thing on.

I think I might add a fabric flower of some sort to the bodice as well.


The Jonah pants were amazingly easy. I used a pattern from a new book that I got called Weekend Sewing by Heather Ross. It's an adorable book with some great patterns and projects included. I'll be making many more of her projects in the future. I used the "Huck Finn" pattern in there for his pants. He got jealous when he saw me trying Sophie's dress on her and I told him I'd make him something. He was very excited when they were done and was oh so comfy and cute running around in them all day.


7.02.2009

I've done my research

Well, it looks like my sewing machine needs to be re-timed. I've researched it online and unfortunately, it looks WAY too complicated for me to undertake myself. So I've called around to a few shops in the area and people are giving me estimates of anywhere from $49 to $89!!! It's hard to imagine spending that much dough on a machine that only cost about $200. But it has to be done, I miss my machine and have several projects hanging in mid-air.

What's funny is that when I went to explain this all to my dear, sweet husband, he was blown away by how much it costs to repair "a sewing machine??". I just shook my head and calmly explained that fixing a sewing machine is much more specialized that fixing a bike (these are terms he understands as he is a cycling enthusiast).

I told him that he reminds me of my dad. My dad would be utterly flabbergasted at the idea that something like a sewing machine, which he as no interest in whatsoever, could cost so much to fix. However, were it his fishing boat or his favorite rod or reel (or a bike for my husband), it would be worth fixing for any price.

Summary: I'm taking my little machine in for repairs today and they say it should be done in less that a week. I sure hope so...my projects are haunting me and causing me to lose sleep.

My poor sewing machine (white one). Sister Laura let me use her cute Hello Kitty machine to finish a project.


Fabric that is yearning to be turned into something delicious.

6.16.2009

What in the...

heck happened to my sewing machine???

I was working on a gift for a friend the other day and the most frustrating thing happened. At one point in my sewing, nearly half of the "item" (I don't want to reveal what it is, as this person might read the blog and I still haven't given her the gift) got shoved under the bobbin casing due to a particularly dull needle. Let's just say I wasn't exactly "gentle" while extracting my work from the machine. I yanked this way and that, up, down, side-ways, all the while trying to lift the needle back out when finally it gave. When I went to re-thread my machine, the stupid needle wouldn't pick up the bobbin thread. I'm pretty sure that if I took this thing to a repair shop, it would likely cost more than the machine itself. So I got out my tools and started dissecting the thing.

I think I've found the problem: the timing seems to be off. Does anyone know how to fix this? I've looked online and have found a few links that might help but boy, I'm not excited to fix it. Dang.

6.08.2009

Fabric Flowers

My dear sister got me started on these. She found this link and started making some adorable versions of this cloth flower. I decided to try my hand at it and they're so easy! They're a great alternative to the typical flowers you find on head bands and barrettes these days.

Here is my version:


And here is one that I created by winding up some cute fabric, just twisting and turning it as I went. There really was no rhyme or reason to it. I sewed it as I went along to keep it in place. I love the vintage look it has. Then I added a red button for the center. I'm definitely going to be making more of these. I think they'll be adorable for some shoes or hairbands or clothes, etc:


Do any of you have ideas for other kinds of flowers? I'd love to hear them!!!

5.13.2009

happy mother's day

laptop bag for mom

This year for Mom's Day I decided to make something with my own 2 hands for my mom. I had a really fun time with this project. For a little intro, my mom is addicted to her computers. She never, ever, ever goes anywhere without her laptop. So, to break up the monotony of black laptop bags, I decided to make her one.

what i used:

1. yellowish linen for exterior
2. coordinating cotton for interior
3. coordinating thread
4. light quilt batting
5. pattern from Sew Darn Cute

how it turned out:


4.30.2009

fishy shoes

something for Jonah

Since Sophie's shoes turned out so well, I decided to make a pair for Jonah too. The soles of Sophie's shoes are made of cotton but since Jonah is more active and runs around, I made his more sturdy. I bought some vinyl at the fabric store the other day. I think it'll be plenty strong for how often/long he wears the shoes.


I also happened to pick up a few more "fat quarters" of fabric. I just can't resist! All of the colors and patterns make me happy!


4.28.2009

project #5 (special request)

baby leg warmers

Here is a cheap, easy way to make your baby some leg warmers. I, for one, am not willing to spend $11 or $12 bucks on a pair of leg warmers when I can make them in 5 minutes for a few bucks. These make great gifts and are very simple to make. Let's get started!

what you need:
  1. A cute pair of knee high socks. If you're making leg warmers for newborns, use a pair of girl's knee highs. For older babies, use women's knee highs. I have even used my husbands worn out socks to make some for my daughter. Just make sure the foot part isn't threadbare. It's OK if there are holes in the toes and heels because these parts will be cut out and discarded.
  2. Coordinating thread


here's how:


1. Cut the sock in a straight line just above the heel line. The leg part of the sock will be the main part of your leg warmer.


2. With the remaining part of the sock, cut in a straight line just below the heel and again just above the toe. Make sure you have straight edges on both ends of the remaining piece. This will be the upper cuff of the leg warmer.


3. Fold the cuff piece in half, right sides out, lining up the raw edges.


4. Find the raw edge of the leg warmer and tuck it inside the cuff piece lining up all 3 raw edges on top. Align the pattern as desired (it's not really necessary to align solids or stripes but argyles or other patterns might require a bit of tweaking).


5. Pin in place.


6. Sew around the end completely. Make sure you catch all 3 raw edges in your seam.


VOILA! You have an adorable leg warmer!! If you want 2, which I suspect you will, repeat steps 1-6.


4.27.2009

project #4

soft-sole baby shoes

There are tons of free patterns online to make your own soft-sole baby shoes. These shoes were a fun, fast project and are super cute! The great thing is that you probably have all the materials on hand already.

what you need:
You'll need some cute fabric scraps for the top and lining of your shoes. You'll also need some elastic (the amount depends on what size of shoes you'll be making). If you want to use a stronger material for the sole of the shoes, you can use either leather or a non-slip fabric (like they use on footy pajamas). You'll also need a pattern or if you're brave, you can come up with your own.


optional patterns:
I used this pattern. Here is a list of different links to patterns for making your own baby shoes.
I really wanted to find a pattern for mary janes but was unable to find a free one. So I'm currently working on coming up with one. I might just post it up here when it's done depending on my mood.


Here are some pictures of my final product. I'm very pleased and plan on making many more--maybe even some for Jonah!


4.23.2009

tip #1

how to sew a perfect circle


I'm currently working on a project for my mom for mother's day. I don't think she reads this blog so hopefully I'm not spoiling anything--but just in case, I won't get to detailed on what the project is until it's complete. Anyway, for this project I needed to know how to sew a perfect circle. I'm not about to ruin it by trying to sew a circle just by following the circle I outlined on the fabric.

Thanks to my dear friend Google, I found perfect instructions on how to do this...and I don't have to buy any fancy gizmos! Just for clarification--I take no credit for this tip but I thank whoever came up with it!

Here's how:
  1. Find the radius of your circle (forgot your geometry? That's half the diameter)
  2. Get a thumbtack and some masking tape.
  3. Let's say my radius is 2 inches. I'm going to place my thumbtack 2 inches to the left of my needle and tape it down using the masking tape (just stick the thumbtack through the sticky side of the tape and tape the thumbtack to your machine).
  4. On your fabric, find the center of the circle and place it on the thumbtack.
  5. Now sew your circle! The fabric will rotate around the thumbtack, allowing you to sew a perfect circle. No guiding necessary!

4.20.2009

last night I dreamt...

about a new design for a baby dress! I was excited to wake up and get it down on paper. Project details to follow!

4.14.2009

project #3

butterick 3846

This is the first baby item I've made using a pattern. I've been working on it for about a month on and off, whenever I had spare time. I finally had to tell myself that it's OK that it takes a long time to complete a project because it's just for fun and I don't want it to become a stressful thing on my to-do list. I learned a TON while working on this outfit. I think working from a pattern is a great idea if you want to learn a lot of the basic sewing techniques.


I used the medium sized pattern. Sophie will probably be able to wear this next Spring. This outfit is 2 pieces, top and bottom.


One of the great things about a simple pattern is that you can get creative with embellishments and making it your own. For this outfit, I picked a really bold fabric with a lot of color variation so it didn't really need much. I used a yo-yo maker and button-cover kit to make these little flowers for the bottom-right of the top.


4.09.2009

project #2

tie-dye...always an experiment

Sophie had some white onesies and I needed some tie-dye. The great thing about tie-dye is that you can't really mess up and the final product is always different!!

The Process:
  1. Mix your dyes according to package directions. This may require a little customizing and cutting corners if you don't want to mix the whole package of dye. You can also buy a tie-dye kit. For this project I used Dylon, which can be purchased at Wal-Mart or any craft store. I only mixed half of each package which still ended up being WAY more dye than we needed. TIP: Don't mix dye in bowls that you love because they may leave them stained. (I learned this the hard way and have stained my pink Williams-Sonoma mixing bowls.)
  2. Tie your shirts/clothing. There are numerous ways to do this depending on what effect you want. The ever-s0-popular spiral look is achieved by pinching the fabric where you want the center of the spiral to be, then spinning the fabric in one direction until you have a tight wheel of fabric. Secure with rubber bands. It doesn't really matter how many rubber bands you use. The dye will seep under the bands so they don't really provide a barrier to color. For other ideas on tying, go here or just search the Internet.

  3. Start dying! We used cups to pour the dye onto the fabric. It may be easier to use squirt bottles. We didn't have any so we improvised. You can also use a spray bottle to get a little splatter action going. TIP: If you want part of the fabric to remain white, don't POUR the dye on, just drizzle it. The dye tends to soak in really easily so go easy.

  4. Wait. Place each article of clothing in a separate plastic bag to keep it moist. For maximum results, let the dye sit for 24 hours before washing.

  5. Wash. First, you'll want to rinse the fabric in COLD water while it is still tied--until the water runs fairly clear. Then untie, and rinse again in HOT water until clear. Then wash your fabric in HOT water, using your regular laundry detergent.

These are simple directions compared to some you'll find on the Internet. I found that this process worked perfectly, however, and I had no need for the more technical instructions (like using soda-ash or synthrapol).

Pictures of the final products: